WHITE FOREST CAKE
I call this the ‘overlooked sister’ to the classic Black
Forest Gateau. Sister cause white is more feminine and overlooked cause it doesn’t
get as much attention as the ‘brother’.
The main and obvious difference is the colour. It is 'white' on the inside and the outside. (at least 'she' is true to her name... she is indisputably white unlike her brother who claims to be black when he's actually brown!) #girlpower 🙋
It also uses less eggs and a bit more flour.
Both their forest names come from how chocolate shavings appear on the whipped cream. And maybe the fact that they either have strawberries or cherries in and out of the cake..(totally made that up!😁)
Now that you have an idea, let's find out how I made mine:
(plus additional for
dusting tin)
Sugar 170g
Margarine 120g
(plus additional for
greasing tin)
Eggs 5
Vanilla essence 1 tsp
Baking powder 2 tsp
Sugar
(optional depending on
sweetness of whipping
cream)
Cherries 200g
White Chocolate 100g
I put all the cake ingredients into my mixing bowl and used a hand mixer to whip gradually moving from low to high speed with the change in consistency until everything was mixed up.
When the batter was ready, I poured it into the cake tin scraping the bowl with my hands to keep as much air in the batter for a light, airy cake.
That was then taken into the oven and baked for 45 minutes until it was ready.
The ready cake was then left to cool on a cooling rack.
When I was ready to make the cream, I took everything out of the fridge and started working immediately.
The whipping cream was measured out and poured into the mixing bowl, I actually didn't use sugar as my whipping cream was already sweetened.
I whipped the cream at medium speed till peaks started to form on it being careful not to over whip.
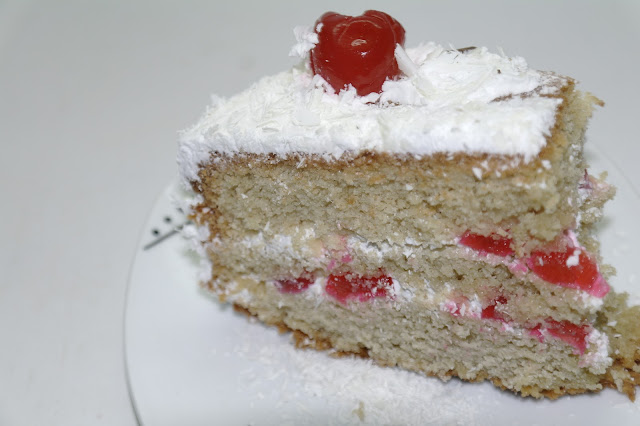
The cake was then sliced into three layers.
The layers were soaked, not fully drenched, using apple juice to make them moist.
In filling the cake, the top layer became the bottom layer and the bottom layer became the top so as to get a smooth finish.
I placed a plate on my cakestand and started working on the layers spreading the whipped cream first then arranging the cherries on top of the whipped cream then the next layer.
On reaching the top layer, the whole cake was covered with the whipped cream.
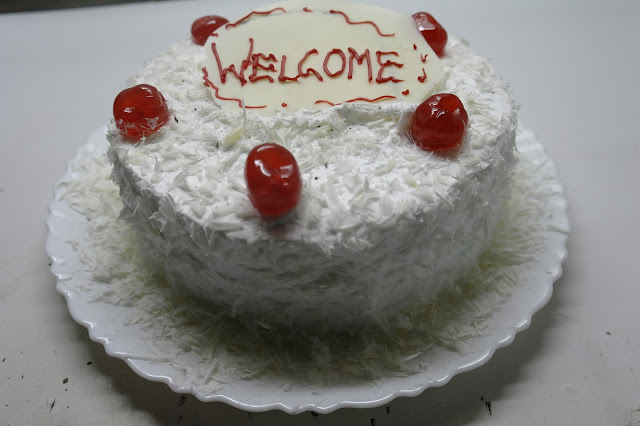
I used a knife to 'shave' the chocolate onto the cake.
I then placed the cherries around on the top.
I melted some chocolate, spread it on a paper then placed it in the freezer to make the name plate for my message. We had visitors so I decided to welcome them with this cake.😁
Wow! It is safe to say that the chunk of the work goes into filling the cake, but the results are just
A-ma-zing!
I got great news!! I'm giving you the best of both worlds! On my Youtube I made The Black Forest Gateau. I did it in square so you can get more insight. Check it out!😉
The main and obvious difference is the colour. It is 'white' on the inside and the outside. (at least 'she' is true to her name... she is indisputably white unlike her brother who claims to be black when he's actually brown!) #girlpower 🙋
It also uses less eggs and a bit more flour.
Both their forest names come from how chocolate shavings appear on the whipped cream. And maybe the fact that they either have strawberries or cherries in and out of the cake..(totally made that up!😁)
Now that you have an idea, let's find out how I made mine:
What I used:
The cake
Flour 170g(plus additional for
dusting tin)
Sugar 170g
Margarine 120g
(plus additional for
greasing tin)
Eggs 5
Vanilla essence 1 tsp
Baking powder 2 tsp
The cream
Whipping cream 300mlSugar
(optional depending on
sweetness of whipping
cream)
Topping/filling
Apple juice 100mlCherries 200g
White Chocolate 100g
How;
The Cake
I started by measuring everything out, preheating oven, greasing and dusting the cake tinI put all the cake ingredients into my mixing bowl and used a hand mixer to whip gradually moving from low to high speed with the change in consistency until everything was mixed up.
When the batter was ready, I poured it into the cake tin scraping the bowl with my hands to keep as much air in the batter for a light, airy cake.
That was then taken into the oven and baked for 45 minutes until it was ready.
The ready cake was then left to cool on a cooling rack.
The Cream;
Immediately after clearing the mixing bowl of the cake batter, the bowl and mixers were washed then put in the fridge together with the jug that was to be used in measuring. The whipping cream was already in there.When I was ready to make the cream, I took everything out of the fridge and started working immediately.
The whipping cream was measured out and poured into the mixing bowl, I actually didn't use sugar as my whipping cream was already sweetened.
I whipped the cream at medium speed till peaks started to form on it being careful not to over whip.
Filling
I sliced the cherries leaving some whole for the topping.The cake was then sliced into three layers.
The layers were soaked, not fully drenched, using apple juice to make them moist.
In filling the cake, the top layer became the bottom layer and the bottom layer became the top so as to get a smooth finish.
I placed a plate on my cakestand and started working on the layers spreading the whipped cream first then arranging the cherries on top of the whipped cream then the next layer.
On reaching the top layer, the whole cake was covered with the whipped cream.
I used a knife to 'shave' the chocolate onto the cake.
I then placed the cherries around on the top.
I melted some chocolate, spread it on a paper then placed it in the freezer to make the name plate for my message. We had visitors so I decided to welcome them with this cake.😁
Wow! It is safe to say that the chunk of the work goes into filling the cake, but the results are just
A-ma-zing!
I got great news!! I'm giving you the best of both worlds! On my Youtube I made The Black Forest Gateau. I did it in square so you can get more insight. Check it out!😉
Enjoy! 😘


Comments